
关于hexo博客搭建和美化的个人心得

基础框架搭建
首先声明:这篇文章仅供自己总结搭建博客中踩过的坑🤔(本文不是教程,不是教程!本人刚开始研究markdown语法,有时候出现问题可能是我个人原因,望谅解)以及标注一些仍待优化及未实现功能。这里我贴上我搭建时参考的教程,非常感谢这位大大😘!
环境配置
- 操作系统:windows10(似乎必须win10,其他系统不兼容)
- 文本编辑器:只推荐vscode(用过都说好👍)
- Git:建议装c盘
- node.js:同上(教程里推荐用低版本,我使用最新版目前没出现过兼容问题)
- github:建议准备一个梯子
- 购买一个域名(不建议用免费的二级域名)
- 云服务器(可以使用免费的vercel部署)
关于存放静态页面的github仓库和git配置说明
- 仓库的格式必须为:<用户名>.github.io(注意:前缀必须为用户名)
- 使用Git Bash配置git的用户名及邮箱
1 | git config --global user.name "你的用户名" |
- 通过
git config -l检查是否配置成功 - 连接到github仓库,公钥文件存放在C:/用户文件夹/.ssh/id_rsa.pub
1 | ssh-keygen -t rsa -C "你的邮箱" //公钥生成 |
butterfly主题安装
- 使用npm方式安装的
hexo-theme-butterfly,后续魔改时更改的文件都是【D:/blog/blog-demo/node_modules/hexo-theme-butterfly】文件夹中的文件。 - 在博客根目录打开Git BASH命令窗口执行
npm i hexo-theme-butterfly. - 建议
把主题文件夹中的_config.yml复制到 Hexo 根目录里,同时重新命名为_config.butterfly.yml。以后只需要在_config.butterfly.yml进行配置即可生效。Hexo会自动合併主题中的_config.yml和_config.butterfly.yml里的配置,如果存在同名配置,会使用_config.butterfly.yml的配置,其优先度较高。
👿不建议更新butterfly主题,否则先前做的魔改文件将一并丢失!
Front-matter基础配置
页面,文章Front-matter配置见: 🍒Hexo博客搭建基础教程(二)
注:第一次搭建时push到github出现不知名报错
butterfly基础设置和美化
导航菜单
修改主题配置文件_config.butterfly.yml
若主题版本大于 v4.0.0,可以直接在子目录里添加 hide 隐藏子目录,如下面的文章
1 | menu: |
文章置顶与指定封面
✔你可以直接在文章的front-matter区域里添加sticky: 1属性来把这篇文章置顶。数值越大,置顶的优先级越大。
✔文章的markdown文档上,在Front-matter添加cover,并填上要显示的图片地址。如果不配置cover,可以设置显示默认的cover;如果不想在首页显示cover,可以设置为false。
右下角按钮
参考这篇教程的第13点🥪Hexo博客搭建基础教程(三)
侧边栏排版
可自行决定哪个项目需要显示,可决定位置,也可以设置不显示侧边栏。
修改主题配置文件_config.butterfly.yml
1
2
3
4
5
6
7
8
9
10
11
12
13
14
15
16
17
18
19
20
21
22
23
24
25
26
27
28
29
30
31
32
33
34
35
36
37
38
39
40
41
42
43
44
45
46
47
48
49
50aside:
enable: true
hide: false
button: true
mobile: true # display on mobile
position: right # left or right
display:
archive: true
tag: true
category: true
card_author:
enable: true
description:
button:
enable: true
icon: fab fa-github
text: 进入'新奥尔良姬翅'
link: https://github.com/planck2003
card_announcement:
enable: true
content: <center><b><font color="#FFA500">无论遇到什么,都不要后悔...</font></b></center>
card_recent_post:
enable: false
limit: 5 # if set 0 will show all
sort: date # date or updated
sort_order: # Don't modify the setting unless you know how it works
card_categories:
enable: false
limit: 8 # if set 0 will show all
expand: none # none/true/false
sort_order: # Don't modify the setting unless you know how it works
card_tags:
enable: false
limit: 40 # if set 0 will show all
color: false
orderby: random # Order of tags, random/name/length
order: 1 # Sort of order. 1, asc for ascending; -1, desc for descending
sort_order: # Don't modify the setting unless you know how it works
card_archives:
enable: false
type: monthly # yearly or monthly
format: MMMM YYYY # eg: YYYY年MM月
order: -1 # Sort of order. 1, asc for ascending; -1, desc for descending
limit: 8 # if set 0 will show all
sort_order: # Don't modify the setting unless you know how it works
card_webinfo:
enable: true
post_count: true
last_push_date: true
sort_order: # Don't modify the setting unless you know how it works
注:为了网站一图流效果,不建议设置footer背景
butterfly魔改内容
live2d安装方法
注意:这个方法只支持moc类型模型,对moc3类型无效
- 插件安装命令
npm install --save hexo-helper-live2d - 在hexo根目录下新建live2d_models文件夹,把下载好的模型文件夹放进去
- 在配置文件
_config.yml(不是_config.butterfly.yml )中配置live2d
具体的配置方法代码见这篇文章:
首页分类磁贴(小冰)注意点
配置_config.yml时,一定注意这里的分类名字必须和自己文章的分类名字一一对应:
1
2
3
4
5
6
7
8
9
10
11
12
13
14
15
16
17
18
19
20
21
22
23
24
25
26
27
28
29
30
31
32
33
34
35
36
37magnet:
enable: true
priority: 1
enable_page: /
type: categories
devide: 2
display:
- name: 教程
display_name: 小冰の魔改教程
icon: 📚
- name: 游戏评测
display_name: 小冰の游戏评测
icon: 🎮
- name: 生活趣闻
display_name: 小冰の生活趣闻
icon: 🐱👓
- name: vue
display_name: 小冰の编程学习
icon: 👩💻
- name: 学习
display_name: 小冰の读书笔记
icon: 📒
- name: 随想
display_name: 小冰の胡思乱想
icon: 💡
color_setting:
text_color: black
text_hover_color: white
background_color: "#f2f2f2"
background_hover_color: "#b30070"
layout:
type: id
name: recent-posts
index: 0
temple_html: '<div class="recent-post-item" style="width:100%;height: auto"><div id="catalog_magnet">${temple_html_item}</div></div>'
plus_style: ""
- devide
参数:2
含义:表示分隔的列数,2 表示分为两列展示
文章置顶滚动栏
使用方法:在文章的front_matter中添加swiper_index配置项即可。
1
2
3
4
5
6
7
8
title: 文章标题
date: 创建日期
updated: 更新日期
cover: 文章封面
description: 文章描述
swiper_index: 1 #置顶轮播图顺序,非负整数,数字越大越靠前
wowjs样式的更换
animateitem.style: xxx #动画样式,具体类型参考animate.css
外挂标签的引入
安装插件,在博客根目录[BlogRoot]下打开终端,运行以下指令:
1
2
3npm install hexo-butterfly-tag-plugins-plus --save
npm uninstall hexo-renderer-marked --save
npm install hexo-renderer-kramed --save主题配置文件中添加:
1
2
3
4
5
6
7
8
9
10
11
12
13
14
15# tag-plugins-plus
# see https://akilar.top/posts/615e2dec/
tag_plugins:
enable: true # 开关
priority: 5 #过滤器优先权
issues: false #issues标签依赖注入开关
link:
placeholder: /img/link.png #link_card标签默认的图标图片
CDN:
anima: https://npm.elemecdn.com/hexo-butterfly-tag-plugins-plus@latest/lib/assets/font-awesome-animation.min.css #动画标签anima的依赖
jquery: https://npm.elemecdn.com/jquery@latest/dist/jquery.min.js #issues标签依赖
issues: https://npm.elemecdn.com/hexo-butterfly-tag-plugins-plus@latest/lib/assets/issues.js #issues标签依赖
iconfont: //at.alicdn.com/t/font_2032782_8d5kxvn09md.js #参看https://akilar.top/posts/d2ebecef/
carousel: https://npm.elemecdn.com/hexo-butterfly-tag-plugins-plus@latest/lib/assets/carousel-touch.js
tag_plugins_css: https://npm.elemecdn.com/hexo-butterfly-tag-plugins-plus@latest/lib/tag_plugins.css
信息卡片修改头像状态
- 修改
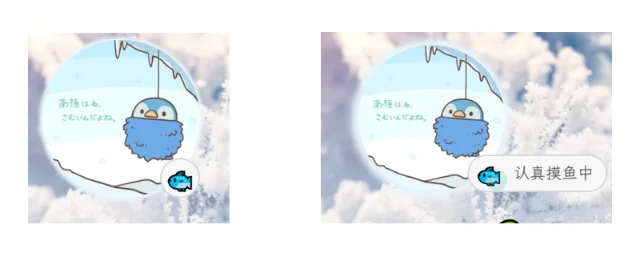
[BlogRoot]\themes\butterfly\layout\includes\widget\card_author.pug其实原理很简单,就是创建了一个新的容器把头像和容器都包住,再用css调节样式就行。🐟那里可以换成任意一个emoji,在win10下只要win+.就可以输入emoji,认真摸鱼中就是对这个状态的描述,建议长度和这个接近,fallback-src是备用链接,当有设备不支持这个emoji时候就用那个图,可以是该emoji的小截图。1
2
3
4
5
6
7
8
9
10
11
12
13if theme.aside.card_author.enable
.card-widget.card-info
.is-center
- .avatar-img
- img(src=url_for(theme.avatar.img) onerror=`this.onerror=null;this.src='` + url_for(theme.error_img.flink) + `'` alt="avatar")
+ div.card-info-avatar
+ .avatar-img
+ img(src=url_for(theme.avatar.img) onerror=`this.onerror=null;this.src='` + url_for(theme.error_img.flink) + `'` alt="avatar")
+ div.author-status-box
+ div.author-status
+ g-emoji.g-emoji(alias="palm_tree" fallback-src="https://lskypro.acozycotage.net/LightPicture/2022/12/fe1dc0402e623096.jpg") 🐟
+ span 认真摸鱼中
暂未实现的功能:
鼠标点击效果